Sunday, December 26, 2010

Cupcake slippers

Guess what we found in my daughter's stocking Christmas morning--yep, these darling slippers. I just had to show you. Cupcake slippers--perfect for her--a girl that spends a majority of her day pretending to bake cupcakes in her little kitchen. She must be my child--obsessed with cupcakes and cakes. I just wish they made them in my size too!

(These are from The Children's Place in case anyone out there falls as in love with them as much as I did when I saw them).

Sunday, December 19, 2010

Deck the Hall with lots of Cupcakes, fa la la la la. . .

What a wonderful time of the year. I can't help but smile just thinking of the Christmas season during the year, and when this season finally comes, I get so excited for all the many fun activities to do and treats to make. I have to admit, this year I haven't done as much with regards to making treats. I'm still trying to adjust to having 2 children from 1 (did I tell you yet?!--We were blessed with another adorable baby girl the end of October-6lbs and a head full of brown curly hair--we sure have a lot to be thankful for this season especially).

I did find some time to make these cute ornament cupcakes for a Relief Society activity. It was an idea I got from Hello, Cupcake. Pretty simple to make, and totally adorable.


I chose to use my jumbo cupcake pan instead of the normal cupcake size (well, I was kind of forced to do that--I realized the night I was making them that I only had jumbo cupcake liners in my stash, and I just didn't want to go to the store), but I really liked how the jumbo size worked well with this idea. Just frost, roll in some decorating sugar, and decorate with twizzler pull and peels, mini M&Ms, spice drops, fruit rollups, and whatever else you have on hand and voila--cupcakes fit for a tree (although I don't recommend decorating your tree with them.

One tip I learned (the hard way)--it is much easier cutting the fruit rollup into the shapes you need if you leave it on the plastic wrap it came on while cutting. Happy decorating and a very Merry Christmas to you!

Friday, November 26, 2010

Pie Night

During this holiday season, I wanted to share with you one of my favorite family traditions--Pie Night. Yep--an evening dedicated completely to eating pie (you can't get much better than that!)


It all started many years ago when my mother got tired of spending so much time making so many wonderful pies for Thanksgiving, only to have them go uneaten because we all were too full after our Thanksgiving feast to eat any pie. She didn't want her hard work to go unnoticed (and uneaten), so we started having Pie Night. The night before Thanksgiving, all our immediate and extended family that was around would get together and eat Mom's pies. It expanded year after year from a few pies to a couple dozen, as all the sisters and aunts would make pies too to bring. It has become a true Pie Feast.

We have shared this tradition with our friends the past few years since we are away at medical school and have been unable to travel home for Thanksgiving. It has become a tradition that they too look forward to each year.


The fun part is to see (and taste) all the different varieties of pies that people bring. Every year I make a few different pies for the night, but each year there is one recipe that I always make--one that I was introduced to while on a mission for The Church of Jesus Christ of Latter-day Saints down in southern Texas. It is called Crunchy Carmel Apple Pie (recipe from the bhg.com website). I wanted to show you a simple, yet cute technique to dress your pies up using this recipe (minus the pecans--we aren't huge nut fans here).


This pie has a streusel-type top, so I couldn't do any decorating with a pie-crust top, but I decorated the rim of the pie by simply cutting out little leaf shapes from an extra 1/2 batch of pie crust that I made.
Just layer the leaves around the edge of the pie before baking.
Then wrap the edges with tinfoil for the first half of the baking time so they don't get overly browned.
You'll end up with an interesting and decorative edge to your pie. And for those of you with young kids, it is a great way to get them involved in the baking process. My daughter loves to help me cut out the shapes with our cookie cutters.
Don't forget the caramel sauce on top before serving! Maybe a few of you out there will try this tradition next year with your family. I offer one suggestion: cut small slices--then you will have room to try all the yummy kinds of pie.
I hope everyone had a wonderful and safe Thanksgiving, full of family, friends, and an outpouring of gratitude for all the blessings we have been given. Have a safe Christmas holiday season, and never forget the true reason for the season--the birth of our Savior and Redeemer, Jesus Christ.

Friday, October 22, 2010

Minnie Mouse Birthday Party

(Update: To see another Minnie Mouse Zebra Cake that I have done recently go here)

I can't believe it--my little girl is 2 (well, as of this Sunday). Where does the time go? We threw her a Minnie Mouse birthday party last weekend to celebrate--a little before her birthday but I'm just getting a little too pregnant, and didn't want to risk having a baby when her party was scheduled for.

Ever since we went to Disneyland in April and her Grammy bought her a Minnie Mouse doll, she has been obsessed with Minnie Mouse. I saw this idea of combining a Minnie Mouse theme with zebra and LOVED it--especially because my little girl loves animal print too.


I was super excited to try making these different Minnie treats. Continue below for tips on making the Minnie Caramel Apples, Minnie Cake Pops, Minnie Mouse cake (with a zebra cake batter) and Zebra Pretzels.


Before you can have a party, you need invitations. I designed these in photoshop, and added a little bow on the head after printing them.

I also found a pattern for these darling Mickey/Minnie Zebra party hats online here. It just takes a little time printing them, cutting them, and sticking in the ears, but they are super cute.

Minnie/Zebra Birthday Cake:
I had seen this idea a while ago that I have been wanting to try--Zebra Cake batter. When you bake it and cut into the cake, it is supposed to have zebra-looking stripes. All you do is make a vanilla cake batter, divide it into two portions, and add cocoa powder to one of the portions making it brown. I also added pink to the other portion to have some pink to go along with the party, but I think it would have turned out a little better leaving it the cream color it is originally.


How you put it in the pan is the trick. After greasing and flouring a pan (and if you are me, putting parchment paper down too because you're extra paranoid your cake will stick), you start layering the cake batter. Start by putting 3 TBSP of one color down in the center of the pan and allow to start spreading on it's own. Then pour 3 TBSP of the next color on top. It will spread out on it's own, and cause the layer underneath to spread out too. Continue alternating colors pouring 3 TBSP back and forth.


After using up all the batter, you should end up with something like this in your pan.


Once you bake it, and cut into it, there should be a zebra-ish pattern. I wasn't too happy with how mine turned out. I was hoping for a little better design, but I had fun trying. To see a great version of the zebra cake as well as the recipe I used, go here.


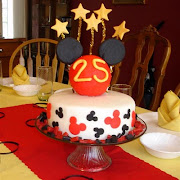
Decorating the actual cake was my favorite part. I made the head out of rice krispy treats using a sports ball pan, and covered it in the black chocolate fondant I had left over from a previous cake. The ears and bow were just a fondant/gumtex mixture that I allowed to dry hard before sticking in the head. The rest of the fondant detailing is pretty self explanatory. I loved my little girl's reaction when she saw the cake for the first time. She kept yelling "Minnie Cake!" over and over.


Minnie Mouse Caramel Apples:
I saw a show about Mickey treats they make at the Disney Parks during the summer, and one of the items they make were Mickey and Minnie caramel apples. I just had to try them myself.


Before anything, you need to prepare your apples. Thanks to my friend Alisha, I found out what that actually meant. There is a layer of wax on the apples from the store. Bring a pot of water to a boil, and quickly dip the apples into the water, then wipe off the wax. This will allow the caramel to stick better. I used 6" dowel rods that I sharpened at one end as my apple sticks.


Next comes the dipping in caramel. Melt some caramel in a double boiler. I used some homemade caramel I had made earlier. That recipe can be found at the end of this post. Dip the apples, then put in the fridge to set while you prepare your chocolate.


Now here is where I varied from what I saw on the show. They stuck marshmallows on caramel for Minnie's ears. I tried that . . . and they kept falling off. So I tried using some leftover melted chocolate from my cake pops to glue them on . . . only about half worked. Finally I resorted to using toothpicks. I am so glad I did. It made the dipping in chocolate a lot easier--I didn't have to worry about ears falling off.


Melt a few bags of dark chocolate candy melts. I didn't have enough to actually dip the whole apple in, so I resorted to pouring the chocolate over each apple in a glass bowl using a liquid measuring cup, allowing excess to drip off, and then pouring the remaining chocolate back into my glass measuring cup to do all over again with the next apple.


To do the skirt you will need 3 things--white candy melts, melted, white candies (I used the York peppermint pieces--you'll have to figure out what to do with all the blue ones leftover . . . that shouldn't be too hard. . . yum!), and pink sanding sugar.

Dip the bottom of the apple in the white chocolate, place the candies in the chocolate, then pour the sugar over and allow the excess to fall off.


Add a little bow, and voila--Minnie Mouse Caramel Apples.

Minnie Cake Pops:
I found this idea on Bakerella's website. They are cake balls on a stick with candy melts as ears dipped into chocolate. Luckily I found some black candy melts at Michaels since it is Halloween time. (You can dye dark chocolate melts black, but beware--the Wilton black food coloring contains water and may make your chocolate seize up. I've run into that problem before.) These were a little more difficult than I expected--ears kept falling off and chocolate was kind of thick and hard to get the excess off--but I managed to get a few descent ones.

For full directions, see Bakerella's instructions here.


And last, but not least . . .

Zebra Caramel Pretzels:
My husband and I love to make these chocolate caramel pretzels for Christmas presents, we usually sprinkle crushed up butterfinger or skor bar on top, but I changed it up a little to get a zebra look.


First take some of the homemade caramel, roll it out into ropes, and wrap it around your pretzels (I like the Snyders of Hanover pretzels).


Next, dip in white chocolate and allow to dry. In the meantime, melt some black chocolate melts and put in a ziplock bag. Snip a tiny portion of the corner, and drizzle over your pretzels to make look like zebra stripes.

Super cute, and super yummy!

Add some containers with matching candy, and you are ready to go--a Minnie-Zebra dessert table.
Now, I can't end without showing you a couple pictures of my cute girl. Here she is with her cake saying she is "2."
And here are all the kids. Let's just say it was quite an adventure trying to get them all to wear their hats and sit down at the same time for a group shot. This was the best we could do. They sure are a fun group of kids, though.

Homemade Caramel Recipe:

This is a recipe adapted from the Licorice Caramel Recipe found in Candymaking by Kendrick and Atkinson
1 14 oz can sweetened condensed milk
1 1/2 cups corn syrup
1 cup butter
2 cups sugar
1/4 tsp salt
1 tsp vanilla
Butter a 9-inch square pan and set aside. In a large saucepan combine the sweetened condensed milk, corn syrup, butter, sugar, and salt. Plac over medium heat ad stir until well combined.
Clip on candy thermometer, and cook, stirring constantly to a firm ball stage (242F if at sea level, 232F in Salt Lake/Provo area, and 237F in Las Vegas area--if you live somewhere else you'll have to do the boiling water test to find out the difference between the boiling temperature at your location vs. sea level to adjust). Remove from heat and stir in vanilla. Pour into pan and allow to stand at room temp over night.

Wednesday, September 22, 2010

Watermelon Cookies


After making the watermelon cupcakes, I really wanted to try some watermelon inspired cookies. I saw this idea on the Taste of Home website, and with a couple changes, came up with these cookies.

(See dough recipe at bottom of post)

After making up the cookie dough, take 1 cup out, and dye the rest red (I used the Wilton no taste red coloring). Roll the red dough into a cylinder shape, about 3 1/2 to 4 inches long. Wrap tight in saran wrap and refrigerate until firm (about 2 hours--or you can pop it in the freezer to speed things along).


Split the remaining cup of dough into 2 portions and dye one of them green, leaving the other half plain. Roll each into a ball, wrap in saran wrap, and refrigerate until firm (1-2 hrs).

After chilling dough, roll out the plain dough into a rectangle on waxed paper approx. 8 1/2-9 inches long and as wide as the red dough log. I used my fondant roller to get equal thickness of the dough. Carefully wrap the plain dough around the red dough. Wrap back up in saran wrap and refrigerate until firm again.


Do the same with the green dough, but this time roll it out approx. 10 1/2 inches long.


Wrap it around the other two colors, trimming excess. Cover tightly with plastic wrap and refrigerate at least 8 hours or overnight, so dough is very firm.


When dough is adequately firm, unwrap it and slice it with a sharp knife, making each slice approx. 1/8 to 1/4 inch thick. You can either put them on a cookie sheet as a circle, or cut each in half to form half-circles.


Add mini-chocolate chips to the watermelon slices.

Bake at 375F for 6-8 minutes, until cookies are firm but not brown. If you baked them at whole circles, take the edge of a metal spatula, and cut them in half while warm. If you did the half-circle, you may want to take the spatula and cut off a little bit to have a very straight looking top.

Cool on a cookie rack and ENJOY! These are almost too cute to eat . . . but then again, they are cookies, so who can resist


Ingredients:
3/4 cup butter, cubed
3/4 cup sugar
1 egg
1/2 teaspoon almond extract
2-1/4 cups all-purpose flour
1/4 teaspoon salt
1/4 teaspoon baking powder
Red and green food coloring
mini chocolate chips

In a large bowl, cream butter and sugar until light and fluffy. Beat in egg. Beat in extract. Combine the flour, salt and baking powder; gradually add to creamed mixture and mix well; set aside.

Tuesday, September 7, 2010

Baby Under Construction


I had so much fun making this cake for my friend Marci's baby shower. A few of our other friends threw the shower for her, using this theme: Baby Under Construction. When I heard what the theme was, the wheels in my head started turning, and this cake is pretty much exactly like my original sketch.

I had two tiers: a 12" square base and 6" square top. I cheated and only did rice crispy treats for the bottom tier (that would have been way too much cake for us to eat). I knew that I needed some brown and black fondant. I didn't have either on hand, nor did I want to run out to the cake supply store and spend a fortune on it, so I decided to make up some marshmallow fondant. I had found a recipe online for chocolate marshmallow fondant, that promised I could get very black fondant from it by only adding 1-2 tsp black food coloring. I have to admit, I was pretty skeptical--true black is usually so hard to get--but I was very pleasantly surprised. I'll post the recipe for it at the bottom of this post.

I put one recipe of the chocolate fondant to use by covering both tiers in it, them my second recipe (which I turned black) I used for my caution tape bow and band as well as the road. Who would have thought that caution tape would bring so many smiles to my face?!

Here is the fun part--adding all the detailing . . .
road closure signs made out of fondant + gum tex

and the cute little orange cones--can't have construction without those. And around here they seem to leave them up on our streets even when they aren't doing construction!


And of course some trucks doing all the work. (I know--I cheated and just bought these rather than trying to make them out of gumpaste. I can only get so much done now with a needy toddler and 30 weeks pregnant. )

this one is plowing the Famous Amos cookie crumb rocks off the road.

and the hazard signs. These were the most fun to make.


My husband and I kept coming up with other ones too:
Caution Wide Load
Road Closure 6 Weeks
Detour Ahead
Bumpy Road Ahead
Watch Shoulder
etc.
We laughed so hard thinking these up.

Well, the party was amazing. I have such incredibly talented friends, who put together an adorable baby under construction themed shower for Marci, complete with table runners, dump trucks, caution tape, matching candy, and so much more.
It was a wonderful shower with wonderful friends.
Congratulations, Marci!


Chocolate Marshmallow Fondant Recipe:
6 oz. of semi sweet chocolate chips (about 1/2 of a bag)
1 bag of mini marshmallows
3 T of clear Karo syrup
3 T water
1 1lb bag of powdered sugar
gel black food coloring (if wanting black fondant)
Crisco

1. Put your marshmallows in a microwave safe bowl, add the water, and microwave on high for 1 minute. Stir mixture, and microwave for another minute. Stir again (marshmallows will be very hot).
2. Immediately add your chocolate chips and stir until the chips are all melted.
3. Add Karo syrup and stir again, this time with a butter knife, making sure that all the syrup is incorporated.
4. If you want black fondant, this is the point when you would add your coloring. I used about 1 tsp and it was very black.
5. Place 1/2 of your powdered sugar in a pregreased Kitchenaid with greased dough hook attached. Pour marshmallow mixture over top (and scrap out all using a spatula). Knead fondant on medium speed. Continue adding powdered sugar in 1/2 cup increments until fondant is not sticky. By the end I usually have to knead a little bit more sugar in by hand on a well-greased surface. The amount of powdered sugar you need may vary depending on the humidity of where you live.

It should be done when it is pliable and non-sticky. I like to wrap mine in a couple of layers of saran wrap and let it rest for a couple of hours before using it. It can be stored for at least a month if coated with a thin layer of crisco, wrapped tight in plastic wrap, sealed in a ziploc bag, and stored in an airtight container.

Sunday, August 29, 2010

Watermelon Cupcakes

This post goes out to my sweet sister-in-law Nicky, who called me up a few days ago for ideas for her daughter's 4th birthday. She wanted to do a watermelon theme, and was wondering if I had any ideas for something she could make that would be cute and easy. After brainstorming for a little while I came up with a few ideas, and decided to try a couple of them out. Here are the fruits of my labors (no pun intended):


I wanted to do something that would require no pastry bags, tips, and piping. All that I used besides the edible ingredients were these things:


A jumbo muffin pan, Wilton's mini-ball pan, and a mini-muffin pan, along with Wilton colors No-Taste Red, Juniper Green, and Leaf Green and a small paint brush (dedicated only to my pastry projects and not to any of my daughter's art projects!).

I made up a simple boxed white cake mix and added the red coloring until I got the pink that I wanted. Then I added about a cup of mini-chocolate chips--for the seeds. One cake mix was the perfect amount to make 6 jumbo cupcakes, 6 mini-ball halves, and 6 mini-cupcakes (I didn't use any cupcake liners--I wanted the pink cake color to be seen).

I made 2 mistakes during this process that I have learned from. 1--don't accidentally leave your bag of mini-chocolate chips on top of the stove when you are preheating your oven. I had a gooey mess on my hands and only salvaged about 1/3 of the bag. What a waste . . . but a yummy waste! 2--don't turn your back on a 22-month old that thinks she can help do everything. She proceeded to finger paint with the left-over egg yolks that I had separated from the egg white that I used. What a mess.

On the other hand, she did love helping, and a perfect job for her was to dye my sugar the different green colors. I just put some sugar in ziplock bags with a little food color, sealed it up, and let her shake and rub the bag for awhile. She thought that was a lot of fun. I was sad that all I had was regular sugar and no decorating sugar, but it was late Saturday, and I didn't want to run to the store, so we made do.

The bottom two plate were from the leaf green and juniper green colors, while the top was a mixture of the two colors together. Okay--cupcakes are cooled, sugar is made--it's time to start decorating.


I tinted some vanilla icing green with my two green colors, and iced the top of my 6 jumbo cupcakes. I love mixing these two colors when I do leaves and vines on cakes. They give just the right green when I do.

I tried 3 different techniques on the tops to see what I liked the best.

1. I rolled the frosted green top in the green sugar that was the combo of the two green colors. It gave a sort of speckled top. Not quite the watermelon look I wanted, so I moved on to my next idea.

2. I placed strips of waxed paper on top of the cupcake like below and rolled the top in the juniper green sugar. Then I removed the waxed paper and rolled the entire top in the leaf green sugar. This was a lot better than attempt #1, but I kept wishing it was the decorating sugar. It would have been much more sparkly I think.


3. Attempt #3 was my favorite. I took some of the leaf green food color paste, mixed it with a tiny bit of water, and painted lines directly on my green frosting. You can be the judge yourself. Which do you like best?


Next thing was what to do with the mini-ball halves. Why not frost them like the cupcakes, and then slice them into watermelon slices to put around the cupcakes? That's what I attempted. First I needed to level the bottoms of the half balls.


Then icing and painting or dipping in sugar (I only did #2 and #3 way). Definitely more difficult than the cupcakes. It was harder to hold on to the half balls when the entire top was iced, then cutting them in slices was also a challenge. I had to kind of smush the knife threw them, so they weren't as clean-looking as I had hoped, but still cute.


With that done it's plating time. First the sugar top ones (cute, but just wait, I love the next one so much more):

Yep, this is definitely my favorite. They just make me happy. And of course, I had to add a little tribute to Mickey.
I hope this helps, Nicky. And maybe someone else out there enjoyed my little experimentation with watermelon cupcakes. Next time maybe I'll try cookies . . . I already have a few ideas for some watermelon ones I want to try.


and if anyone is wondering what happened to the 6 mini-cupcakes that were baked . . . well, a decorater needs some nourishment while she works!