Monday, September 2, 2013

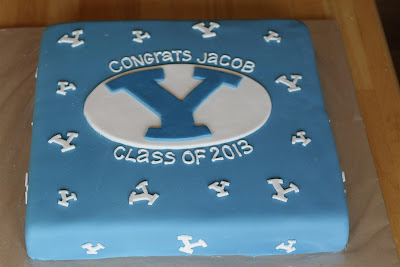
BYU birthday/graduation cake


The Midwest--it has been an adventure our first year here--huddled in our basement bathroom during numerous tornado warnings, trying to drive in white-out conditions during blizzards, or shoveling snow All. Day. Long.  Now don't get me wrong, there have been wonderful, amazing things too living here--sitting outside just after dark and watching the fireflies twinkling through the sky, or watching the numerous corn fields go from muddy nothingness to acres and acres of gigantic corn stalks overnight (well, maybe not overnight, but it grows fast).  The people here are truly friendly--a place where everybody actually does know your name.  Yes, we know our neighbors and talk on a very frequent basis.  Hah, that didn't happen back in Las Vegas.  

One more thing I have learned in the past couple of months from living here--midwesterners take their grad parties pretty seriously.  It is a BIG DEAL.  I think back to when I graduated high school--we had a graduation party the school threw, but I sure didn't have my own grad party, nor did any of my friends.  I was a little surprised when I found out my nephew in Minnesota was having a grad party, and I was flat out shocked when he told me he had invited 250 people.  What!  I don't think I even knew 250 people as a senior in high school.  We were driving up from Iowa to Minnesota for his party and he asked me to make a cake for it.  Now it wasn't just a grad cake, it was also a birthday cake since my dear nephew's party was on his 18th birthday.  So what kind of cake do you do for this?  Well, Jacob (aka my dear nephew), knew exactly what he wanted.  Really.  Exactly.  He even sketched the whole thing out for me with every last detail.  Here's the picture to prove it:


You've got to know my nephew, he has always been the one to ask me cake questions whenever we are around, or want to watch me make cakes.  Maybe that is why he is one of my favorites--we bond over cake.  Well, this made my job easy.  I just had to replicate his drawing to the T, or Y--there were Ys everywhere.  It was a BYU themed cake--that is where he is off to for college and his favorite college team.

I started by baking 8 8x8 square cakes...it was a lot of baking.  That was the day I was kicking myself for only owning 1 8x8 pan.  Having another one would have made things go so much quicker.

Then the layers were stacked and filled to make a 16x16 square.  

A lot of blue fondant and several hand-cut Ys later and you get...


Just like he wanted.  I finished it just in time to carefully pack it, my 3 girls, husband, and all of our stuff in our van and drive 6 hours to Minnesota.  It made it in one piece without any damage (Whew!).


My sister-in-law had just the place for it at the party (an please ignore the ugly board it is on--my nephew called me 3 days before I was leaving for Minnesota and asked me to make the cake.  Between making the cake and taking care of 3 kids age 4 and younger, I just didn't have time to come up with something better). 

This was my favorite stop of the night:
 The chocolate fountain.  Mmmm, mmmm, good.  Especially those chocolate dipped cinnamon bears.  Not quite as good as those we would by at the BYU bookstore during college, but a descent second place. Remind me to tell Jacob to mail me some of those when he is off at the Y for college.

 OK, dessert wasn't the only yummy thing at his party.  My brother grilled up some killer beef and chicken kabobs, while Jacob's raspberry lemonade with fresh basil was super delicious.


We just had to do the whole sing and candles thing.  Isn't my nephew cute?! That's my dad in the immediate background.  He's the best dad in the world.  Then there is my brother Dave in the far background, with camera...and the apron.  Lookin' good, Dave.

I just had to sneak in a few pictures of my crew for you guys.  This is my hubby.  Isn't he cute?!  He was a HUGE help this weekend helping get things ready for this party.  He's holding Princess #3 in his arms.  She was only 5 weeks old in this picture.  Tomorrow she turns 4 months.  Sniffle, sniffle, she's growing up too fast. (And don't you love the lake in the background?  I'm slightly jealous that my brother has this in his backyard).

Princess #1 could be found most of the evening out by the fire pit making s'more after s'more after s'more...


 And then there is Princess #2 who sure did enjoy those s'mores that her sister made.

And last me and the graduating guy.  Super fun weekend.  Glad the cake made it to Minnesota in one piece!

Thursday, July 25, 2013

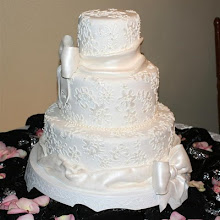
Here Comes the Bride


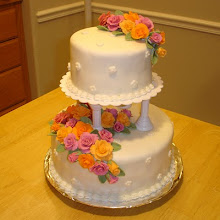
Here is a little wedding cake I did the beginning of June (I'm still adjusting to having 3 kids and my blogging has suffered!  Sorry this is almost 2 months late!).  This was a real treat to do--I love doing wedding cakes--creating a cake for such a special and elegant occasion.  


The bride's mother sent me a picture of what her daughter wanted.  There were times while I was decorating that I wanted to add some edible pearls here or some luster dust there, but my husband kindly reminded me that I should do it how the bride wanted it, so I held back on the bedazzling (ooh, but it was hard to restrain myself!).


The bride loved the cake, so that made it a total success.  I am so glad I got this opportunity to be a part of this wonderful couple's special day.  Thank you Dawson family!


Tuesday, May 14, 2013

Relief Society Birthday Cupcake Buffet


Back in March I was asked to do a cupcake buffet for our church's Relief Society Birthday activity (I know--back in March--I am a little behind, but the good news is our new addition made it here safe and sound and we are "tickled pink" the 3rd time around--3 girls now to teach cake decorating to :)  I saw an idea on Pinterest for a balloon and streamers backdrop that I knew would be perfect for the event, and I wanted 5 different flavors of cupcakes to go along with the 5 colors of balloons.


In the end I came up with these 5 flavors for the event:
  • Pink = A Pink Lemonade cupcake with whipped cream frosting, filled with raspberry cake filling, and garnished with one raspberry.
  • Orange = An Orange Poppyseed cupcake with cream cheese frosting, filled with sweet orange curd, and garnished with an orange slice.
  • Yellow = Pina Colada cupcake with coconut flavored whipped cream, and garnished with a pineapple slice
  • Green = Mint Chocolate cupcake with mint buttercream icing, filled with mint chocolate ganache, and garnished with an Andes Mint.
  • Blue = Rootbeer Float cupcake topped with rootbeer buttercream icing, and garnished with crushed up rootbeer candy and a straw.


My friend Shersten had the task to do all the decorating, so she took the idea I gave her from Pinterest, and did an amazing job creating this beautiful backdrop for the cupcakes as well as another similar backdrop for all the dinner food that we also had.


I found these chevron liners in all the colors from The Bakers Confections on Etsy and just had to get them for the event.  They went perfectly with the chevron paper I found at Hobby Lobby for the flavor card for each type of cupcake.  They were a good quality liner too--I had no issue with the chocolate or rootbeer cupcake showing through the liners and masking the color of the chevron print. And don't the Andes Mint cupcakes look divine?!  I have to say they are my favorite (I am always partial to mint chocolate over everything).


The cupcakes were a hit at the event.  Everyone started cutting them in half and sharing with friends so they could try all the flavors.  All were thoroughly enjoyed, but the Pina Colada cupcake seemed to be the favorite flavor to most people.  


Shersten also did the decorations for the tables, having cutely wrapped presents on each one (I am having her do all my wrapping from now on--look how perfect her wrapping job is!)  Who would have guessed that underneath all the wrapping paper are boxes and boxes of her food storage--hah, putting it to good use :)


 It was a fun evening with food, games, and wonderful company.  The women in my ward are so fantastic, and I loved getting to know each of them better that evening and sharing with them a little part of who I am with the cupcake buffet.


Wednesday, April 24, 2013

Rubber Ducky Baby Shower


Last month I had the opportunity to co-host a baby shower for my good friend Krissi.  She just had the cutest little boy last week and we were so excited to celebrate her upcoming arrival a few weeks before.


We went with a rubber ducky theme--I love rubber ducks and I had been eyeing the ducky cupcakes from What's New Cupcake for a couple years now with the itch to make them.


They were fun to make.  Donut hole for the head and half of a marshmallow for the tail.  My favorites are the ones with their bums up in the air.


I saw a cake with a similar ducky motif around the sides on Pinterest and wanted to try it out.  None of my cricut cake cartridges had a ducky on it so I had to resort to a cookie cutter.  It took a lot of searching to find a mini ducky cookie cutter small enough to be able to do this cake, and I finally found one on Etsy.  


Did I mention she is having a boy--hence the one blue ducky :)


I saw a recipe on pinterest for this ducky bath drink--ginger ale, blue koolaid, grape juice, and pineapple sherbet.  It froths up like bubbles in the bath, and tasted really yummy.


I got this idea for the picture from my friend Rachele who threw a ducky shower a couple of years ago.  It says "D is for Duck" underneath the picture.

Here are a few other of our cute decorations:


Directions for the ducky in the fish bowl can be found here.  I was excited to make it and take it home afterwards--my daughters' bathroom is a ducky theme and this fit in perfectly with the decor :)


Carrie, my co-host made some delicious cream puffs filled with chicken salad as well as some savory pretzel bites.  They tasted so good.


After 2 girls, Krissi was excited to get some cute little boy clothes for baby #3.  We are so glad that he made it here safely.  And I have to admit that I am a little jealous that she had her baby last week--I have been just 2 weeks behind her this whole pregnancy, and am ready for my little one to come.  38 weeks today.  Waiting, waiting, waiting...

Thursday, March 21, 2013

Blue and Gold Banquet


Every February across the United States, cub scout groups are having their annual "blue and gold" banquet--a sort of birthday party to celebrate the establishment of the cub scouting program.  This was my first year to help out with this banquet.  No, I do not have any boys.  I actually have 2 adorable little girls and another girl on the way (my husband is seriously outnumbered around here), but my dear husband happens to be the "cub master" in our church congregation's cub scouting program. He gets to be in charge of things like the blue and gold banquet, pine wood derby, space derby, and other events for the scouts.  Thanks to his new calling I am slowly starting to learn the ropes of cub scouts, even all of their silly cheers and jokes (some of which I can't help roll my eyes at, wondering how they find it so funny, then realizing that I have never been an 8-11 year old boy so I probably will never understand).


When my hubby asked me to make 100 cupcakes for this event, I immediately knew that I wanted to do my blue velvet cupcakes--just your classic red velvet cupcake with royal blue dye substituted for the red.  Topping that with a delicious cream cheese frosting and wrapping up the bundle in a gold foil wrapper would be perfect for a "blue and gold" banquet.


Yes, they were very, very blue. Maybe I'll use a smidge less blue coloring next time.


I had just gotten in the mail my new french star tip.  I have wanted this tip for awhile and was pretty giddy to try it out.  Oh, how I love it--making such pretty and elegant spirals of frosting on top of the cake.

I also ordered in from Amazon.com a fleur de lis chocolate mold to make these chocolate toppers for the cupcakes.  After making all the molded chocolates out of blue and yellow candy melts (I did add extra royal blue oil based dye into the blue candy melts to get the right color), I brushed them with some dry gold luster dust to add some shimmer and make them look a little more like metal/gold instead of chocolate.


The result was this cute little cupcake with an edible cub scout symbol on top.


This was the display I set up in my home so I could take some pictures before heading over to the church with all the cupcakes--I wasn't so sure of the set up my dear husband had in mind.  Sometimes our "visions" are a little different--him more practical, me more arsty I guess.  This is what it ended up being there...


A table set up in the storage closet off of the gymnasium.  He insisted that if I did a display, they had to be in there, so the doors could stay closed until it was actually time for dessert.  I guess he had a point--there is no telling what kind of self control 8-11 year old boys might have when there are 100 cupcakes staring them in the face all evening.  I joked with my hubby that at least he coordinated the backdrop with the evening by having a blue and yellow ladder propped against the wall.  We both got what we wanted I guess--me, the ability to arrange them all cute like little marching cub scouts (and let's be honest, that was probably all for me, since what 9 yr old boy really cares about what something looks like as long as it tastes good), and him the ability to "control the situation" and prevent chaos from breaking out in the middle of his speech...


Oh yes, and a delicious tasting cupcake.  That's probably what mattered most to him and the boys :)

Sunday, March 3, 2013

Cupcake Bouquet


For Valentine's Day I wanted to surprise my sweetheart with something edible, cute, and totally different from other Valentine's day treats I have made for him in the past (brownie chocolate box or conversation heart cake).  I came across The Cindy's Confections Blog that gave a little tutorial on how to make a cupcake flower bouquet.  I was intrigued and wanted to give it a go, especially after making this cupcake topiary for part of my daughters' birthday party in October.  


First step:  bake about 35 mini cupcakes.  That gave me enough to cover my flower pot with a couple leftover.  I chose 4 different flower designs for this arrangement--you can do more or less depending on your preference.  I used tip 81 for the green mums, tip 1M for the pink roses, tips 104 and 233 for the yellow sunflowers, and tip 2D for the pink/yellow hydrangeas.  Looking back I should have taken the extra step to color some icing brown for the sunflower centers, but I was rushed for time and couldn't bring myself to dirty another icing bag, so green it was--still cute but maybe not quite as real looking.


I snagged that pot leftover from my cupcake topiary, filled it with rocks to weigh it down, then took 8 styrofoam bowls, which I used for the top.  Sit one bowl right side up, put the other 7 upside down on top of the first bowl, and tape them together.  Then cover it all with green tissue paper, and put it on top of the pot. I used a piece of clear tape to go around the pot and anchor the bowls to the base.


Then comes the fun part--arranging the flowers. I used 2 toothpicks per cupcake to attach them to the bouquet.  Stick the toothpicks in the bowls first, then carefully poke the cupcake onto the toothpicks.


I started at the base and worked my way up to the top, trying to get them as close as possible to each other.


There still were some little gaps here and there, so I took the advise of that tutorial I mentioned above and got some fake floral leaves to help fill it in and make it look even more real (real flower bouquets usually have greenery, right?)


And that is it.  I was so excited for Chris to get home from work that day and see his bouquet of flowers sitting on the table.  He thought they were beautiful...but more importantly he thought they were delicious.


After all, the way to a man's heart is through his stomach, right?!